
If you want to "cut to the chase," scroll down to the bottom for what you need to put this thing together.
Edit (12/01/2013): Since this posting a couple of years ago, the resonator has been in constant use for many hours each day. It has worked flawlessly, even after taking a number of bumps, dents and scratches.
Edit (08/22/2014): This resonator has become to be known as a "Hillbilly Amplifier" since it's played in the shadow of the Smokies :-)
I envisioned using an aluminum pie pan. A couple of weeks back I went to a local kitchen store and looked around. They had a variety of pie pans. One of them was beautiful -- it was shiny chrome. But it wasn't an ideal size/shape, had an edge that was not rounded and it weighed a lot. Others had non-stick surfaces and would look strange on the Dixie.
Finally, I saw a 9 inch round aluminum Cake Pan that looked promising. It didn't have the deeply flared sides that a pie pan has, but it looked like it would fit well.
Before I went to the store, I had taken measurements on a Dixie that's taken apart. I figured that I had to have at least a pan bottom that was 8.5 inches in order to clear the body of the Dixie. The 9 inch cake pan had a slight flare in the walls.
This is what I bought.
 |
| Hamilton Beach 9 Inch Aluminum Round Cake Pan |
 |
| The code for the cake pan |
 | ||||||||
| Pay no attention to the holes and scratches :-) |
The photo above was taken after I'd started hacking this thing together, but you can see the slight flare of the sides.

The pan's measurements are:
- Bottom diameter - 8 inches (and it's a 9" cake pan?)
- Top rim diameter (outside to outside) - 9 inches (ah, a 9" cake pan!)
- Side height - 1 5/8 inches
- Flare - that amount you'd find going from 8 to 9 inches diameter with a side height of 1 5/8 inches. The shorter the side height for these same diameters, the greater the flare.
As I looked at the pan in the store, I was envisioning buying some kind of clamps that I could use to attach the thing to the Dixie's body. Then I remembered the threaded stock that holds the head clamp in place on the Dixie (it's size is 10-24). Could I somehow use hardware to connect to it?
 |
| Notice that the threaded stock goes beyond the head tightening nut here. |
I remembered seeing spacers used in electronics and mechanical devices, but didn't know what they're called when they're threaded. The internet answered my question. They're coupling nuts -- made to hold two pieces of threaded stock together. Perfect, if I can find the right size.
The local hardware store had two 3/4 inch coupling nuts -- not enough! They had no idea when they'd get more, so I went to the internet.
 |
| Two 3/4 inch 10-24 coupling nuts being held together with threaded stock. |
 |
| These came in record time. I love good service from internet savvy companies! |
I already had some 1 1/2 inch 10-24 bolts to use. My idea was to use one 3/4 inch coupling nut to tighten on the Dixie threaded stock. Then, use one of the bolts through a hole drilled in the cake pan to connect it to the threaded stock. I'd do this four times on evenly spaced threaded stock on the Dixie.
Problem was, it didn't work!
I failed to realize that the neck of the Dixie would be in the way of the cake pan's sitting evenly on the coupling nuts. And, the coupling nuts were not long enough anyway.
What to do?
Oh, and by this time I'd drilled the four holes I'd measured using the head tightening rim on the disassembled Dixie. Thus, you'll see some extra holes from the final "design."
I decided to use two coupling nuts on four of the Dixie threaded stock "head tensioners." I cut the 1 1/2" 10-24 bolt in half and used the headless part to connect the two coupling nuts together. Then I could use the headed part to attach the cake pan to the coupling nuts.
I also realized that I had to cut the cake pan where it would fit where the neck was hitting the pan.
 |
| So far, the cut has not tried to continue onto the bottom of the pan. |
 |
| The two bolts/nuts you see are "mistake" holes :-) |
Measuring for the holes in the pan was impossible using my limited set of tools and tricks. I got one of them like it should fit and ended up pushing the pan flat and using a small screwdriver to scratch the pan where the coupling nuts hit it.
Thank goodness I bought some 10-24 washers, because my holes ended up being larger than the ones better measurement methods would have resulted in. But none of them were too large to hide with the 10-24 washers :-)
 |
| The holes in actual use are the ones with the bolts with washers. |
 |
| The wiring inside the body is covered in an earlier post about lighting the Dixie. |
I used lock washers to keep the coupling nuts from loosening when I unscrew the bolts holding the cake pan.
 |
| Haven't added the bottom lock washer yet. |
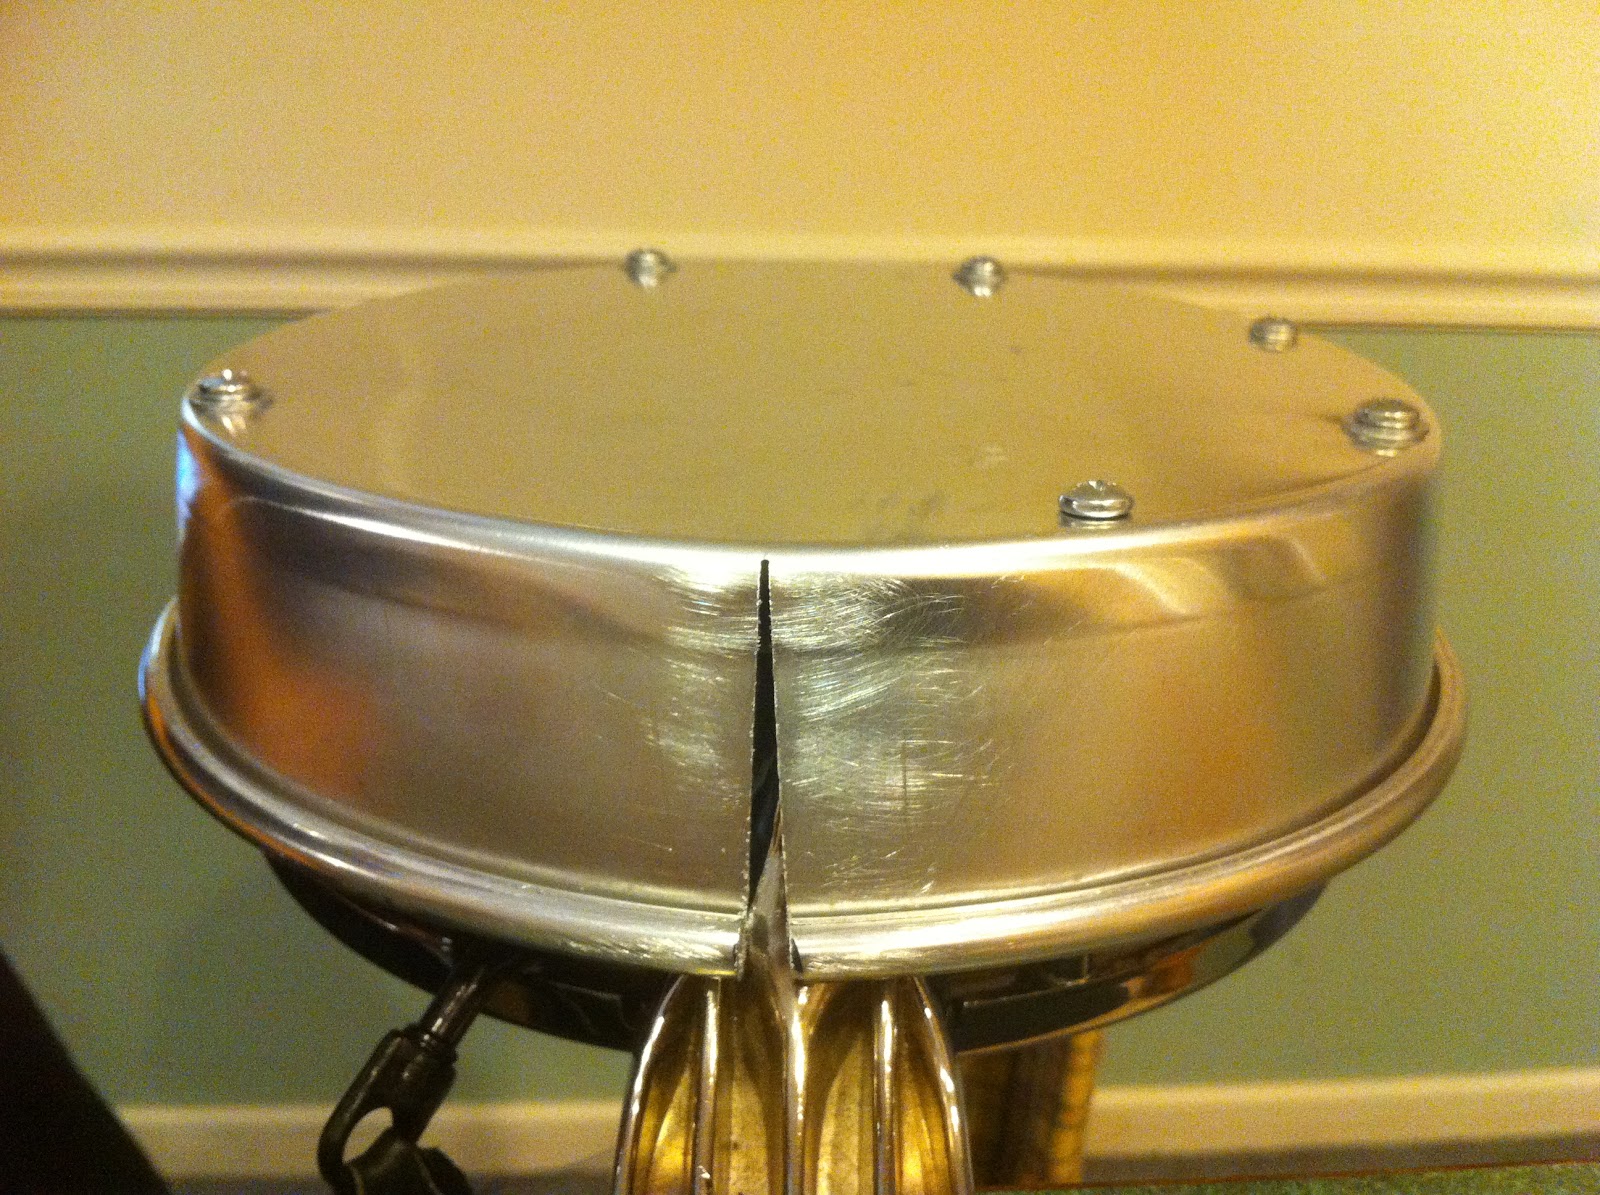 |
| The cut in the pan worked. I smoothed the rough edges with sandpaper. |
 |
| The Cake Pan Resonator looks pretty good in playing position. |
 |
| Ready to go in the oven :-) |
How does the Dixie feel with this thing added to it? Slightly different being a bit further from the player's body, but not so much that it causes a problem.
Here's a shopping list if you want to put this thing together and try it out. This is what I recommend after going to the school of hard knocks in putting it together the first time:
 |
| This was $1.29 for two feet |
- A cake or pie pan with an 8 inch diameter bottom (and I'd say at least an 8 1/2 inch rim).
- Eight 3/4 inch 10-24 coupling nuts (I looked for 1 1/2 inch ones and couldn't locate any)
- 10-24 threaded stock (keeps you from having to cut bolts). Can also be used to replace threaded stock on your Dixie that's too short for this project. Can be bought in smaller lengths, I'd guess. See photo above.
- Four 1/4 inch 10-24 bolts (I could only find 3/8 inch locally) -- rounded Phillips head recommended.
- Eight 10-24 lock washers (two per pair of coupling nuts).
- Four 10-24 washers (one per bolt).
- Drill bit for 10-24 bolt holes. Depending upon your measuring skills/equipment, I'd have the next two larger sized bits, too :-)
- Hack saw blade for smooth cut on the cake pan (if required).
- File, sandpaper, emory board for smoothing rough edges on cuts to pan and/or threaded stock.
 |
| Factory smooth 10-24 bolts! |
If you're going to need to replace your Dixie's threaded stock where the coupling nuts will be attached, do that first, one at a time. Remove one of them completely from the head tightening rim. They're screwed into that rim. Use some WD-40 to loosen a tough one. Make sure not to get any oil on the Dixie's head! I'd spray some into a small container and pour a small amount down the threads.
I would suggest adding 1/4 inch to the length of the too short stock.
Cut four 1/2 inch lengths of the threaded stock to connect four sets of two coupling nuts together. Try to make sure that 1/4 inch of stock is inside each coupling nut. Use a lock washer between each set of two coupling nuts. No need to tighten more than a snug fit.
Mount the coupling nut sets to the four points you've chosen. The points I used have worked well, but you may have reason to choose others. Use lock washers to keep the coupling nuts snug to the Dixie's threaded stock.
If you have to cut the pan so it will fit correctly at the neck/body junction, do that now. You may not have to cut completely down the side of your pan, but I found it necessary to keep the bottom of the pan from trying to bend.
Press the pan onto the body of the Dixie until the coupling nuts furthest from the neck contact the bottom of the pan. Make sure that the pan is centered on the body. If you push it enough to contact all four coupling nuts, that's ok.
Make some kind of mark/scratch on the sides you can reach on one of the connector nuts, so you'll know where to drill the first hole.
I used a regular 10-24 nut to line it up with the scratches. Then I put a permanent marker in the center of the nut and made a mark.
Drill a hole large enough for the 10-24 bolt to fit through without you having to fight with it.
Put the pan back on the Dixie and thread a bolt with a washer through the hole and into it's coupling nut. A few turns is enough right now.
Once again, press the pan onto the body of the Dixie until the other furthest coupling nut comes into contact with the bottom of the pan. Make sure the pan is centered and that you have the pan all the way down on the one bolt you have screwed in a little. Scratch similar marks for this coupling nut.
Remove the pan and drill the new hole.
Put the pan back onto the Dixie and put both bolts with washers into the holes and screw into the coupling nuts a few turns. If the second hole does not align, take the pan off again and widen the hole a bit in the appropriate direction until you can screw the second bolt in. If the hole is really off, you may want to widen both of the existing holes in the appropriate opposite directions to minimize the change you'd have to make to just the second hole. When both bolts fit, screw them down so they hold the pan snugly against the coupling nuts they're threaded into.
On the third coupling nut (one of the ones closer to the neck), make sure you push down on the pan until both it and the fourth coupling nut are touching the pan's bottom. You may have to put some pretty good pressure to make this happen. Go at it slowly to allow the cut you made to widen without trying to split further.
Mark the third hole and remove the pan once again to drill that hole. Replace the pan and three bolts/washers (bolts screwed in just enough to see if the third hole is in the right place). If you cannot get the third bolt aligned, take the pan off and widen its hole in the proper direction. Again, if it's far off, you may have to widen the first two holes as well as the third one.
When the three fit, tighten them down so the pan is snug against the coupler nuts. Push on the pan to make sure the fourth coupling nut is snug against the bottom of the pan. Make your mark/scratch. Remove the pan again and drill the fourth hole. Replace the pan and the first three bolts/washers. Don't tighten them completely down. The fourth hole should fit, but if it doesn't, take the pan off and widen it (and maybe a couple of others) to get it to fit. When everything lines up, tighten the four bolts (with washers in place).
And you're through!
Now play your recording of your non-resonator Dixie. Then play your Dixie with the newly installed resonator. You should hear quite a difference :-)
Finally, let me know how things turned out!