TUNING PEGS! The older, plastic buttons can just crumble in your fingers. Some of you might say, "No problem, just get out the really small vice grips and keep on strummin'!" So, what's those of us without vice grips to do?
Finding pegs with the correct size shaft seems to be impossible today. They've added 1/16 of an inch or more to the minimum size diameter available. For a wooden instrument, this is not much of a problem. For the Dixie, it's a problem that will definitely require careful consideration.
- Do I want to modify an antique instrument?
- Do I have access to a drill press and carbide drill bits?
- Will the "standard" peg diameter change again?
- What if I eventually find some original diameter replacement pegs?
I am facing the replacement of a full set because one button cracked. Many internet sales sites list sets but fail to state the diameter. "Fits most ukuleles" is not a very helpful statement.
According to an email I received from Joe at Elderly Instruments (
elderly.com), "the closest tuners we have [for a Dixie banjolele] are stock # UP26. The shaft is slightly larger, so you will need to enlarge the hole in the peghead from 0.15" to 0.19". That is from 5/32" to 3/16" approximately. I hope this helps." It did help -- especially the exact measurements. I bought a set of the UP26 pegs ($8.95 at the time). I have yet to use them. I keep hanging onto hope that I'll find some that are the correct size.
 |
| UP26 Peg from Elderly Instruments |
- The part of the shaft (on the left) that goes into the button, is square. This is a good design -- much better than having two sides square and two rounded off.
- The metal rings next to the shaft are (from the top) top and bottom view of what comes with the peg, and a finish washer which did not come with the peg.
- The bottom of the ring that comes with the peg is made to fit countersunk into the instrument. This would work easily with a wooden banjolele. For the Dixie, you'd have to have a matching countersink hole drilled. Otherwise, this part would sit up on the Dixie and look sorta strange. Wish I could show you on a Dixie, but I haven't enlarged a hole to see this peg in place. The bottom ring is a #6 Finish Washer (available at a hardware store). I would use it in the place of the ring that came with this peg so I don't have to drill a countersink hole. Besides, what if the peg designs change and a different (or no) countersink hole is required?
- The plastic rings are top and bottom view. This is what causes friction between the peg and the peg head. It is obviously made for a wooden instrument. The side that goes toward the instrument has raised lines which would keep it from slipping on wood. The other side is a bowl that the button fits into. It may be possible to use this piece, even though it is redundant for a Dixie, since the Dixie has the metal "bowl" built in. Using the plastic on top of the metal might look funny, but you'd have plastic against plastic for friction as opposed to having a plastic button against a metal bowl (and possible faster wear).
- The screw has one of the heads that will allow either a flat head or a Phillips screwdriver. I always use a Phillips screw/screw driver as they are much less likely to mess the head up.
Here are the pegs from the original "Red" model and the "Black" model, side by side:
Oh, how I'd love to run into a few sets of the peg on the left. See the metal above the button? It provides the friction against the Dixie's lower friction "bowl." Metal against metal plus WD-40 equals lifetime operation. The plastic button on the right is both the friction provider and the button. The peg on the left was on my mother-in-law's "Red" Dixie when it was given to her in the 1950's. I do not think it is what originally came with that model. Since the original owner owned a music store, he may have replaced the original pegs with the best ones available at the time.
I had to replace the screws on the peg type on the left. They were flat head and totally impossible to tighten. I found Phillips head type and added a lock washer sandwiched between two flat washers to keep it rock steady on the tuning.
 |
| Side views. |
You may notice that the top of the shaft (with the hole for the string), is longer on the metal friction peg.
 |
| The all plastic button/friction model taken apart. |
This
may be an original peg for a Dixie. The washer between the tuning head and the shaft is the #6 finish washer. They are readily available at your local hardware store. This one's original with this Dixie, so it's not shiney. The screw that holds it all together is in the button. It has a washer "built in."
The shaft on this peg has two flat and two rounded sides. You can "sort of" see it in the photo below. From the screw hole end it would look like (_) (you can provide the straight line connecting the top of the parentheses :-)
 |
| The plastic/metal button peg. |
|
|
That's a #6 finish washer and a #3 flat washer. The same washers and screw works for all the original pegs on the Dixie's we own.
Here's a closeup of the metal friction piece above. It has a slot where the button fits:
 |
| The button "nestles" in the slot you see. |
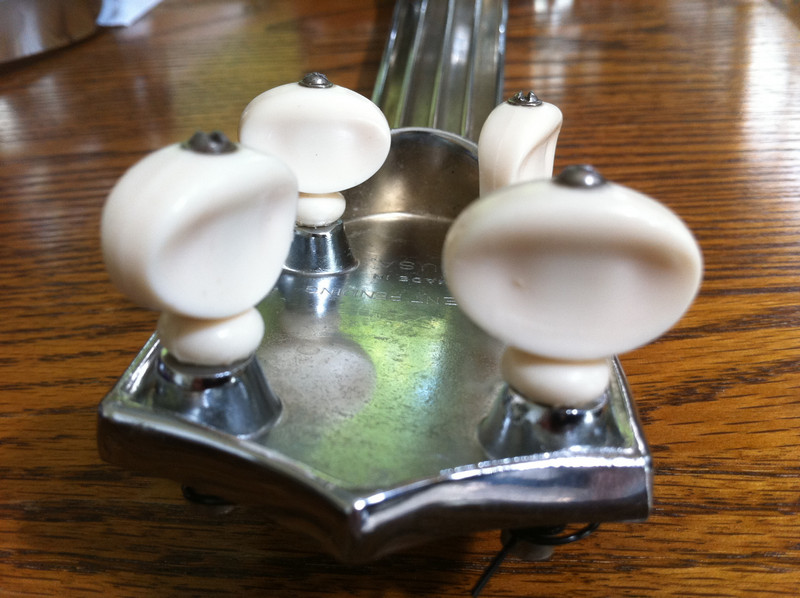
Here's a third type peg from the third model we own (played daily by my wife, so I won't be able to show things taken apart).
These have been trouble free. They have flat head screws with a washer built in. This model of the Dixie had no paint, and I don't know if it ever had any. I suspect a former owner cleaned it and removed any paint. The chrome on this one's pristine. Except for the head, the whole banjolele looks new.
So, my experience has been three different pegs on three different Dixie's.
I'd be interested to hear what type pegs you have. Photos would be great. Maybe we'll get to the bottom of which pegs are truly the original. As I type this, our fourth (and possibly final) Dixie is in transit. It looks to be in very good shape. Maybe it has a fourth type of peg? We'll see.


